I came across an article that talked about perspective that I'd like to share with all of you. I believe the person who wrote the piece was someone named Martina Cecilia and she has a blog named Electicalice.tumblr.com Its a great site I highly recommend it :)
___________________________________________________________
Perspective was one of the first things Davinci would make his students learn. I believe he made them learn it before he introduced them to proportions!
A lot of people think perspective is very difficult but little do they know perspective can be easy if you know a few rules. If this is your first time hearing the word perspective. It means 'point of view.' It's when an artist can draw objects and you can tell exactly how far, tall, and big they are.
When I first was learning how to draw in perspective in elementary school it made me feel as if I was creating a window into another world. That feeling is a great one and I hope that this post can help you feel the same if you just starting to learn how to draw.
Have your lines reach a vanishing point

"But DANNY, its such a minor mistake, the image looks fine to me!"
- True, the red line's mistake is a very subtle one, but drawing is all about the details. The more effort you put in double checking your work, the greater the quality will be. People will notice the time you put into your work, they might not be able to tell you why your work looks better but they will FEEL it. So grab a ruler and always check your perspective.
 |
| LOOK! Even the little details such as doors still follow the Yellow lines... |
When more than one line isn't following the rule and doesn't line up with the vanishing point, things can start to look confusing. There are times when you have to draw something that makes you break this rule, it's rare but it does happen. But 9 out of 10 times, You need to follow the vanishing point rule.
 |
| The red lines do not go to the vanishing point |
Objects look smaller the farther away they are
Look at these two images of 'buildings'. The second image feels correct bc the closer to the vanishing point the building is, the thinner it gets.


-"Danny, how do I know how thin to make the building, should I guess?"
No, there is also a rule on how thin/smaller to make an object the closer it gets to the vanishing point. This one seems complicated but if you do it once, you can do it all the time. Make sure you use a ruler!
 |
| Lets say you are drawing columns - set up your vanishing points and draw your first two columns how ever you want. |
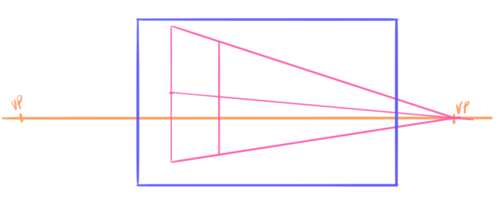 |
| Look at the 3 Horizontal pink lines. The most important one is the Pink Line that goes through the middle and cuts the columns in half. |
 |
| Draw a diagonal through one of the squares (RED LINE) |
 |
| At the end of the red line, you will draw a new column!! |
 |
| Keep drawing diagonals (RED LINES) to draw as many columns as you like! |
 |
| Now you can use this rule as a guide to correctly draw columns perspective. |
TIP: The closer the object is to the viewer, the thicker the line should be
This is not a rule, this is just a tip that can help add depth to your drawing! If you have ever seen some mountains that were far away, do you ever notice the ones further away are harder to see? You should do the same to your lines in your drawings! If nature does it, you can do it too. You can even start to leave lines out when they start getting too close to each other. Simplify when you can without breaking the rules :)
Don't be lazy! Find reference and use it to make your drawings better!
Take this window for example! The quality is in the details :) It'll bring realism to your drawings.


Last but not least, remember perspective applies to people as well. A lot of people will draw figures and not CHECK to see if they are the right size when compared to the other objects in the drawing. Grab your ruler and never forget to check your drawings :)


I hope this helps you out. I know the internet is a big place and it's hard to find good advice. That's why I sometimes post things I find from other sites here for you to read. Remember, I didn't invent perspective, so my way isn't the right way or the only way. All I do is share what I know. Drawing is fun and it shouldn't be hard, if perspective is really difficult for you, keep practicing and don't be afraid to ask people for help.
(source)
 |
| lines are all dark... |
 |
| Far away lines are lighter :) |
Don't be lazy! Find reference and use it to make your drawings better!
Take this window for example! The quality is in the details :) It'll bring realism to your drawings.
Last but not least, remember perspective applies to people as well. A lot of people will draw figures and not CHECK to see if they are the right size when compared to the other objects in the drawing. Grab your ruler and never forget to check your drawings :)
I hope this helps you out. I know the internet is a big place and it's hard to find good advice. That's why I sometimes post things I find from other sites here for you to read. Remember, I didn't invent perspective, so my way isn't the right way or the only way. All I do is share what I know. Drawing is fun and it shouldn't be hard, if perspective is really difficult for you, keep practicing and don't be afraid to ask people for help.
(source)


