Showing posts with label drawing. Show all posts

Saturday, August 15, 2015

Why does Disney still have drawing classes?

PREVIOUS POST    -- NEXT POST 
               

(I read this really cool article a while back! Thought I'd summarize it here because it touched upon some important things students and new animators should keep in mind! Enjoy the post!)


The Disney Studios

"Disney makes movies with only computers now, nobody draws, CG is destroying the business, Remember when animation used to be good??"

      This is shit I read on the daily.. But it couldn't be further from the truth! Over here at Disney we draw, and are always learning. For about 82 years this studio has been developing and teaching artist behind the scenes through figure drawing classes and with lectures on classical drawing.

Why??
       As artist we are dealing with characters. Characters have bodies and we have to know how to move them believably! Other wise you get animation that looks like it came straight out of 'QWOP'


      In these drawing classes here at Disney, they don't just lock us in a room with "it's a small world" blaring from speakers as projectors flash the words: "MAGIC MAGIC MAGIC" over and over, lol. We actually have some pretty cool drawing masters lead the class and walk around as we draw the model. Sometimes as they will politely interrupt you and say, "Nice!" While other days they might sit down and give you a personal demo on how to nail that foreshortened knee.
      You can create an animated film with out knowing how to draw. But it's more about what drawing knowledge can add to your art. "You can't achieve dynamics with out bones and structure, and in order to have structure you need to study it. From there one can extend out in any direction towards any style." -Karl Gnass

      Check out this drawing by Glen Keane. Drawings like these influence how the characters are created and sculpted in computer animated films.

   On a more personal note, these drawing classes aren't to just have us in tip-top shape 24/7. They also serve as an escape. I know I go to these 2 1/2 hour classes during lunch to get away once in a while. Some people play Foosball, others sit and video chat with love ones. All day you are working on the directors vision and bringing it to life which is awesome! Though, getting some 'me' time to remind myself, 'hey I have ideas too' is also great. I get to do what ever I want in that class and have some fun creating something for no one other than me. That opportunity to do that in your work place is priceless!

      Who do we have to thank? Art Drawing classes started at Disney around 1932 thanks to Art Babbitt. It was uninstructed at first, but then Disney hired Don Graham, who taught at an art school in Los Angeles.

Figure Drawing back in the day

    Now to something relevant: You will see computer artist who are attending drawing classes with the sole intent to gain some secrets of how things move by studying anatomy and structure. They don't understand that its more than that. You have to not only understand why something is right but also how to create it from the inside out with feeling. (WOA DANNY, that was way tooo artsy. slow down there) All I'm saying is that you don't draw to become an animator or to work in animated films. You draw to help yourself become an artist. And that said, Artists can make the best animators.

Thanks for reading!
The original article is here so make sure to give it a look for it is much better written :) Original text

Tuesday, February 17, 2015

Animation 101: REACTIONS

PREVIOUS POST -- NEXT POST    

Reactions should be communicated with CLARITY
      Anticipation is the one of the most important animation principles that plays a main
role in bringing life to a character. In general we use the term to express a waiting of the next move. I would like to bring to attention a less talked about term: the 'reaction'. This might not be a technical foundation of animation but it is essential to an entertaining performance. In the 'reaction' of a character is where the personality of a character can show. A well rounded animator must not only learn how to prepare the audience for an action, but also to relieve them with a reaction.  


      Your animated characters reaction to an action that follows an anticipation will let your audience know how to react. You can notice characters in cartoons using extreme anticipation to engage into a powerful action, such as a sudden run, or hitting with an axe, or playing golf. And then contrast the action with a subdued reaction usually drawing laughter from the crowd. Droopy was one such character whos personality was a superb contrast to over exaggerated actions. Exaggeration is a common factor incorporated in anticipation and reaction. The same can be said with underplaying an anticipation and reaction. Being aware of your characters reaction is essential to creating believable performances in animation which is appealing and enchanting to the viewers eye. 

"Danny we already know this!"

Great, then I go move on to my point. CLEAR REACTIONS! A piece of work lives and dies with the viewer. One will notice pieces of art live longer when they are clear. While the viewer quickly grows uninterested with the messier unclear ones. Clear reactions can resonate with your viewer and leave a lasting impression. A good example of clear poses that relate to the viewers are memes. They are universal and easily recognizable no matter how specific the emotion being depicted is. Take a look at a small collection I have gathered here from the internet. You might recognize some of them.


      These are some awesome expressions that have been shared around the internet hundreds of thousands of times. if you are ever in need of a specific expression look no further! Memes are here to save the day! I mean it, I often reference memes if I'm ever in a bind or need inspiration. 

(quick tip: never go look for help from something generally accepted from the art world, Look for things that resonate with thousands of people on the internet. There will be something about it that makes it connect better. Its up to you to figure out what that x-factor is and use it to your advantage!)

Below I found some memes that can maybe be considered anticipation to something the character might say. They are clear and sometimes exaggerated! (such as the table flip ...which I'm afraid I'm guilty of doing here and there


This post is a grossly simplified overview of reactions, but I hope it plants a seed so that you can start to see this concept in a new light. I hope you all enjoyed it and I look forward to doing more posts. Continue to draw, continue to learn!

Monday, February 9, 2015

Disney Characters in Real Life

  PREVIOUS POST --- NEXT POST

     I came across these images a while ago and I have tried to search for the artist with out success. (EDIT: found him! Harry Mcnally ) I thought these are too interesting to not share so here you go! When you look at them just don't think, "That's nice.." but try to figure out why you like the photos (if you even do like them)

      Is it that the B&W make the colors pop, is it the contrast of flat characters in 3D backgrounds, is it that their expressions are so well drawn that we accept them in a realistic setting.. all of the above? Or is this artist a Photoshop hack that was just looking for quick attention? What ever your opinion or thought, its all right. I'm just asking you to have one :)


Monday, August 4, 2014

Why a bouncing ball?

PREVIOUS POST -- NEXT POST    

    I found this wonderful post on Cartoon Brew-ED that I feel all animators need to see. It illustrates how all 12 principles of animation are used in animation. If you are a student and you're thinking, "why am I learning how to do a bouncing ball?? WHY!?" This hopefully answers your question. If you can animate a flour-sack well, you can animate anything. The only thing standing in your way are probably technical skills such as drawing.


Post by Cartoon Brew-ED.

Wednesday, July 16, 2014

PERSPECTIVE 101

PREVIOUS POST -- NEXT POST  

  I came across an article that talked about perspective that I'd like to share with all of you. I believe the person who wrote the piece was someone named Martina Cecilia and she has a blog named Electicalice.tumblr.com Its a great site I highly recommend it :) 

___________________________________________________________

     Perspective was one of the first things Davinci would make his students learn. I believe he made them learn it before he introduced them to proportions!
      A lot of people think perspective is very difficult but little do they know perspective can be easy if you know a few rules. If this is your first time hearing the word perspective. It means 'point of view.' It's when an artist can draw objects and you can tell exactly how far, tall, and big they are.
      When I first was learning how to draw in perspective in elementary school it made me feel as if I was creating a window into another world. That feeling is a great one and I hope that this post can help you feel the same if you just starting to learn how to draw. 


Have your lines reach a vanishing point


     This is the most important rule to know.. Notice in the image that all the yellow lines all go to one point (the vanishing point). Always make your lines go to the same point. Notice how the red line does not go to the same point as the yellow lines. Its an awkward line and it's wrong.

"But DANNY, its such a minor mistake, the image looks fine to me!"

- True, the red line's mistake is a very subtle one, but drawing is all about the details. The more effort you put in double checking your work, the greater the quality will be. People will notice the time you put into your work, they might not be able to tell you why your work looks better but they will FEEL it. So grab a ruler and always check your perspective.

LOOK! Even the little details such as doors still follow the Yellow lines...

      When more than one line isn't following the rule and doesn't line up with the vanishing point, things can start to look confusing. There are times when you have to draw something that makes you break this rule, it's rare but it does happen. But 9 out of 10 times, You need to follow the vanishing point rule. 


The red lines do not go to the vanishing point


Objects look smaller the farther away they are
     Look at these two images of 'buildings'. The second image feels correct bc the closer to the vanishing point the building is, the thinner it gets. 


-"Danny, how do I know how thin to make the building, should I guess?"
      No, there is also a rule on how thin/smaller to make an object the closer it gets to the vanishing point. This one seems complicated but if you do it once, you can do it all the time. Make sure you use a ruler! 


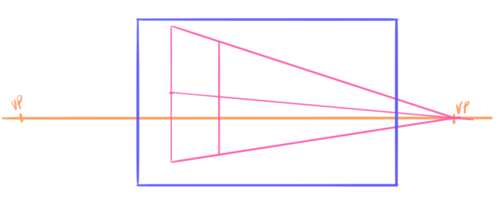
Lets say you are drawing columns - set up your vanishing points and draw your first two columns how ever you want. 
Look at the 3 Horizontal pink lines. The most important one is the Pink Line that goes through the middle and cuts the columns in half. 
Draw a diagonal through one of the squares (RED LINE)
At the end of the red line, you will draw a new column!!
Keep drawing diagonals (RED LINES) to draw as many columns as you like!
Now you can use this rule as a guide to correctly draw columns perspective.

TIP: The closer the object is to the viewer, the thicker the line should be
      This is not a rule, this is just a tip that can help add depth to your drawing! If you have ever seen some mountains that were far away, do you ever notice the ones further away are harder to see? You should do the same to your lines in your drawings! If nature does it, you can do it too. You can even start to leave lines out when they start getting too close to each other. Simplify when you can without breaking the rules :) 
lines are all dark...
Far away lines are lighter :) 


Don't be lazy! Find reference and use it to make your drawings better!
       Take this window for example! The quality is in the details :) It'll bring realism to your drawings.

     Last but not least, remember perspective applies to people as well. A lot of people will draw figures and not CHECK to see if they are the right size when compared to the other objects in the drawing. Grab your ruler and never forget to check your drawings :)


     I hope this helps you out. I know the internet is a big place and it's hard to find good advice. That's why I sometimes post things I find from other sites here for you to read. Remember, I didn't invent perspective, so my way isn't the right way or the only way. All I do is share what I know. Drawing is fun and it shouldn't be hard, if perspective is really difficult for you, keep practicing and don't be afraid to ask people for help.

(source)

Monday, July 7, 2014

How To Improve Your Creativity 101

PREVIOUS POST -- NEXT POST

It's been a while. I wont make a big deal about this being my first post in almost half a year, obviously my clavicle is healed so lets just get right back to business :)

Staying creative is one of many things an artist must do to be successful

      It takes a lot of motivation and drive to continue making art. You will read MANY things that insist that they are the key to retaining your momentum and increase your drive. They are all a little bit true and a bunch of bull at the same time. Every person is different and will have different ways to get motivated. For example some people like it rough with the stress of deadlines while others enjoy a slower, thought out pace. It makes sense to me that what might motivate one person will not motivate another. 

      Today I read something that I felt spoke directly to me and gave me tons of energy inspiration. I read 4 tips about creativity by the creator of a comic strip called "Calvin & Hobbes" (Bill Watterson) I'll share them with you:

1) You have to lose yourself in your work
     Make your art and your thought process should be one. Inject your opinions and how you see the world into your work and let it inspire your imagination back. 
(I'm always thinking about my animation and even during stressful times, dream about it! This small tip I can relate to a lot)

2) Create for yourself

     Once in a while forget that you have an audience and just do what you like. Aim to make yourself laugh or a close family member. 
(I especially like this note because when you enjoy the work you are doing, you don't mind working hard and putting a 110% into your art)

3) Make it beautiful

     I'm going to quote the exact words bc it hits it right on the nose: "My advice has always been to draw cartoons for the love of it, and concentrate on the quality and be true to yourself. also try to remember that people have better things to do than read your work. so for heaven's sake, try to entice them with some beauty and fun."
(always do your best!)

4) Every medium has it's power
     Whether its the power for a few seconds strung over 10 years or a national anthem being sung at the World Cup Finals, video games, or crafts... Every Medium has a way to connect to people that is unique.

The internet never stops being creative

         These four tips have helped me out, I hope sooner rather than later you also find what you need to stay pumped about your work

Thursday, January 23, 2014

A Note on Using Reference


Maybe most of you can relate to this story:
         5th grade, and all your classmates know you are the kid that can 'draw'. You have a little sketch book of drawings of Pokemon and other random things you think are cool. You take pride in your drawings and you kinda let yourself feel like: "hell yea, you know what? I CAN draw" Then one day you are put on the spot, someone asks you if you can draw them a Tiger. You try to say you don't draw in front of people but everyone crowds around because they want to see how you draw a tiger. So you try to draw a tiger and the damn drawing ends up looking like freakin kitty cat.

          Why is it that when you are at home laying stomach down and you have a ripped page from a magazine to look at and copy from, you can draw anything! But when you try to draw from your mind and have nothing for reference all your drawing skills disappear?

WHY?
          Well in my opinion: When one hasn't developed a photographic memory, their mind usually defaults to cliches and generic drawing solutions. While developing as artist, free style drawing is usually their weakest area. People like drawings that breath life and remind them of the real thing. Even if the drawing isn't perfectly photo-realistic, if it has enough detail from your reference, people will accept it. This is probably why life/figure drawings or copied drawings usually get a lot of wow's, ooo's, and Ah's. They were drawn from life/something real and they have details in them that regular people wouldn't think of including into a drawing. Even caricatures and portraits are specific enough where the viewer accepts the drawing enough where they start to invent personalities and feelings to associate with the image.

         Every artist uses reference in one way or another. Michelangelo, Da Vinci, Norman Rockwell and even Disney artists! They all use reference. (they actually used live models, they would sketch them and then use their sketches as reference while working on their final painting) But using reference doesn't mean 'to copy', reference is to be used as a starting point and it should always be improved upon.

IMPROVE UPON?
           Here are a few images from the 1950's I found on the internet. You will see the reference in black and white and the finished painting on the right. You can see the photo the artist used for their foundation and if you study it closely you can see the specific changes the artist made in the final piece of art. Use this chance to test your observational skills and see how many changes you can spot between the reference and the final painting. If you want a greater challenge: Try to figure out WHY the artist made each change.


ARMS: The artist chose to switch the girls arms so that the other one held up the sheet.
LEGS: are more vertical up and down than in the photo. Forces the legs to line up with the vertical arm above them. which makes a line that leads you to the face of the girl. And the face in turn, leads your gaze to the mirror. You might think I'm over thinking it but these are just some of the elements that make a drawing stand out from the rest.
LEANING towards the mirror rather than away. 
EYES: in the reflection her eyes were changed to look down to bring focus on the tan line.
MIRROR: shape is changed. A square is too masculine! A circle is a much more 'softer' shape to compliment the female.


HEAD:Turning the head screen right forces a twist in the body/neck that is visually more interesting than having all the main body parts orientated in the same direction.
LEGS: Are tucked in to simplify the silhouette 
ARMS: Are changed so that the object's silhouette do not compete with the woman's silhouette. The box top is brought in closer to the body.
PILLOW: It's a better decision to tuck it in behind her so that she 'leans forward' more towards the viewer 

Very little difference here

         Sometimes the artist will really like their reference and literally copy it. *GASP* ...and it's not a bad thing! *DOUBLE GASP* Your audience will never see your reference so all they know is that these drawings/paintings have come straight out from your imagination. It might feel like cheating but it's not. When all is said and done it is still your work and your decisions that we see. Keep in mind this is not the right and only way to use reference. I urge you to find your own (but similar) process for using reference. Stay away from stiff character designs and generic poses!! 

Wednesday, January 8, 2014

Art Spotlight: Sculptures

PREVIOUS POST -- NEXT POST

Art through Shadows
        I came across this a while ago and it's too great not to share. This art has no practical purpose and I love it. Art doesn't need to entertain or help you out in your daily life, art can be made to just simply challenge your imagination for a moment. It takes time to create something like this and if it wasn't for the patience of artists.. the world would be quite boring indeed.

Real Life is Rubbish, 2002 Mixed Media

       Tim Noble and Sue Webster make piles of discarded wood, welded scrap metal, broken tools, cigarette packets soda cans and piles of trash to create amazing images! Every piece is thoughtfully put in it's place taking into consideration it's shadow on the wall. From piles of nothing come recognizable figurative images that capture your interest for more than just a moments glance. More art from these artist  can be seen on their website: TIM NOBLE AND SUE WEBSTER

Dirty white Trash (W/Gulls), 1998;
6 months worth of artists' trash, 2 taxidermy seagulls

Wild Mood Swings, 2009-10
2 wooden step ladders, and discarded wood


The Original Sinners, 2000; Replica fruits, bark, moss, bowls, fishing wire, cooking oil, metal


She, 2004 Welded scrap (Part 1 of 2 from a diptych)
 _________________________________________________________________

        Remember that anything can be made into art! Art doesn't have to confine itself to film and drawing. I posted this because it is a good example of unlikely medium. Ask yourself, "Would you call these shadows Art?" I hope it challenges you to accept things out side the box and influences you to once in a while step outside the box as well. Keep in mind that just because a method or something isn't popular doesn't mean it's not worth anything. Let your mind wander and explore things you once thought stupid or a waste of time, you might find new value where there was none before.